
A check engine light with P0455 or P0442 often leads to a new fuel cap and nothing else. Sometimes that is enough, but EVAP faults also come from purge valves that stick, vent valves that will not close and tank pressure sensors that drift. This guide walks through the evaporative emission control system from a diagnostic point of view: what each part does, how the ECU tests the system, which checks find the fault quickly and which codes to expect.
What the EVAP system has to do
Fuel vapour forms in a petrol tank whenever the fuel warms up or is moved around, and especially during refuelling. The EVAP system routes that vapour into a charcoal canister, where activated carbon holds it. When engine conditions allow, the ECU opens a purge valve, intake vacuum pulls fresh air through the canister, and the released vapour is burned in the cylinders. On systems with leak monitoring, the ECU also proves at intervals that the whole system is sealed.
Component by component

- Canister: stores vapour in activated carbon. Repeated overfilling of the tank can push liquid fuel into it, which can affect purge flow and cause fuel smells.
- Purge valve: normally closed and PWM-controlled by the ECU. Duty cycle sets how much it opens; actual flow also depends on intake vacuum. Turbo engines often have an extra purge route to the compressor inlet for operation under boost.
- Vent valve: normally open, letting air in and out of the canister through a filter. It closes only when the ECU seals the system for a leak test.
- Tank pressure sensor: reports small pressure or vacuum relative to atmosphere and is the main input for most leak tests.
- Fuel cap or capless filler: its seal is part of the system, and a loose cap after refuelling is a classic cause of leak codes.
Purge strategy and fuel trims
Purge is normally enabled only with a warm engine in closed-loop lambda control and is ramped in gradually. Because canister vapour is unmetered fuel, the ECU watches lambda as purge opens: a rich swing tells it the canister is loaded, and it trims injection down and estimates the vapour concentration. Many ECUs keep that purge correction apart from long-term adaptation, and some learn mixture adaptation only while purge is closed. For diagnosis this means a short-term trim that dips when purge opens is normal behaviour, while strongly negative trims at idle with purge commanded closed point to a leaking purge valve.
How leak tests work
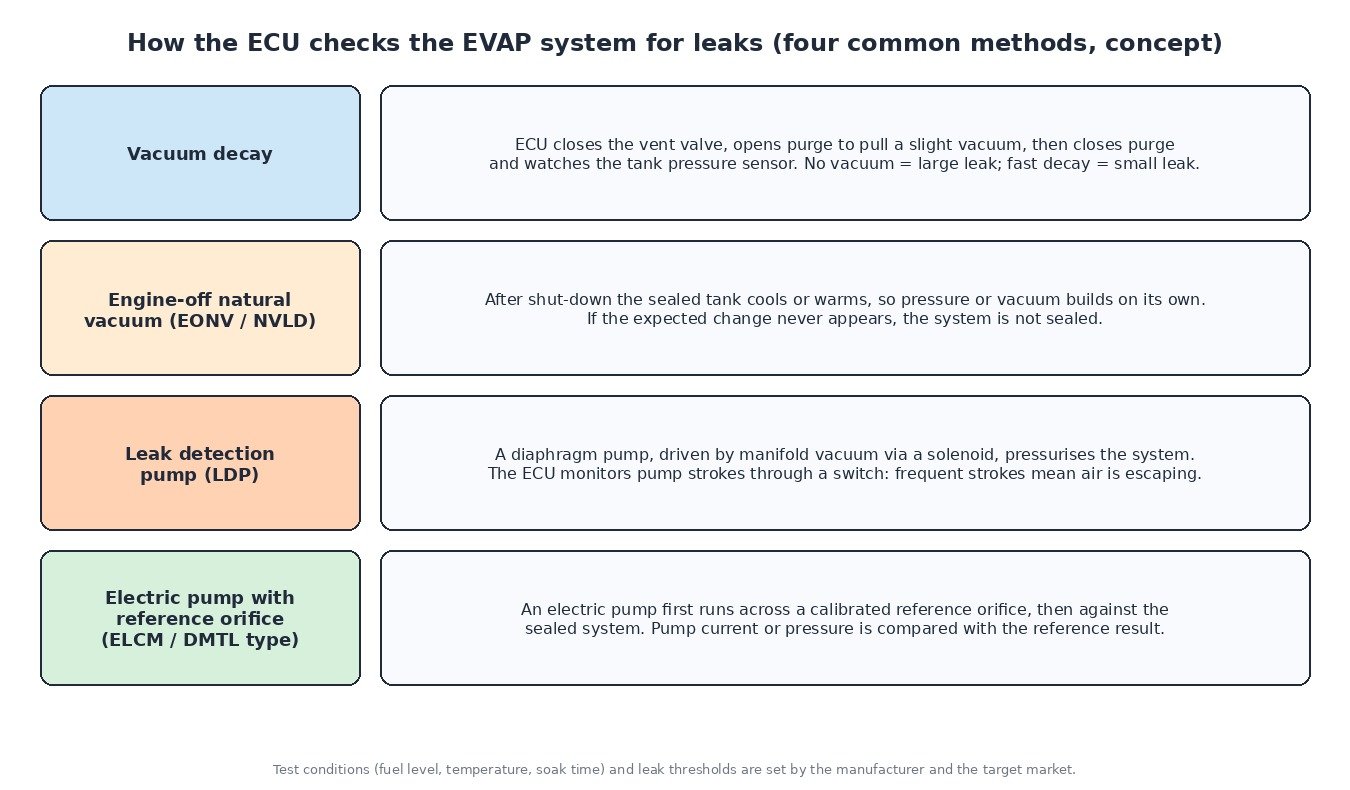
Leak monitoring is mandatory for most light vehicles in North America, while many European-market versions only monitor purge function and circuits. Common methods are:
- Vacuum decay: vent closed, purge opened to draw a slight vacuum, purge closed, then the pressure sensor shows whether the vacuum holds.
- Engine-off natural vacuum (EONV, NVLD): after shut-down, temperature changes in a sealed tank create pressure or vacuum on their own; no change indicates a leak.
- Leak detection pump (LDP): a vacuum-operated diaphragm pump pressurises the system, and the ECU judges leakage from how often the pump has to stroke.
- Electric pump with reference orifice (ELCM, DMTL): the pump runs against a calibrated orifice, then against the sealed system, and the ECU compares the two results.
Each test runs only under defined conditions such as fuel level, temperature and soak time, which is why the readiness monitor may take several drive cycles to complete after a repair.
A practical order of checks

- Read codes and freeze frame and note whether the fault is a circuit code, a flow code or a leak code.
- Inspect the cap and filler neck, including the seal and the cap’s fit.
- Use live data and output tests: command purge and vent valves and watch the tank pressure sensor, fuel trims and lambda respond.
- Check purge valve sealing: an unpowered purge valve should hold vacuum from a hand pump. Vapour flow at idle with purge commanded off is a typical cause of high-purge-flow codes and hard starting after refuelling.
- Smoke test at low pressure through the service port or a suitable hose, with the vent commanded closed, using equipment intended for EVAP systems.
- Clear codes and let the monitor run again to confirm the repair.
Notes by vehicle type
Cars and vans follow the layouts above. Petrol and LPG bi-fuel light trucks keep a full EVAP system for the petrol tank; when diagnosing mixture in either fuel mode, check whether purge is active. Petrol utility and agricultural machines may have a canister and low-permeation fuel lines where rules require them, sometimes with passive purge and no ECU control. Motorcycles built as California models, and many recent Euro 5 models, carry a canister with a purge valve to the throttle bodies, so idle mixture readings on a bike can also be influenced by purge.
When you work on the calibration
Keep EVAP intact and its diagnostics active. When logging, record purge duty next to lambda and trims, and judge the fuel calibration in phases where purge is closed. A restored stock file brings back the manufacturer’s purge strategy and monitors as originally designed.
Related fault codes (DTCs)
Generic OBD-II codes (SAE J2012). Manufacturer wording varies, and vehicles without leak detection hardware use only part of this list.
| Code | Meaning | Typical causes |
|---|---|---|
| P0440 | Evaporative Emission System Malfunction | General EVAP fault: leak, purge or vent valve problem, tank pressure sensor fault |
| P0441 | Evaporative Emission System Incorrect Purge Flow | Purge valve stuck or blocked, cracked or disconnected purge hose, saturated canister |
| P0442 | Evaporative Emission System Leak Detected (Small Leak) | Worn fuel cap or filler seal, cracked hose, leaking canister or valve seal |
| P0443 | Evaporative Emission System Purge Control Valve “A” Circuit | Purge valve wiring, connector or coil fault |
| P0444 | Evaporative Emission System Purge Control Valve “A” Circuit Open | Open circuit in wiring or valve coil, unplugged connector |
| P0445 | Evaporative Emission System Purge Control Valve “A” Circuit Shorted | Shorted valve coil or wiring |
| P0446 | Evaporative Emission System Vent Control Circuit | Vent valve stuck or not responding, blocked vent filter, wiring fault |
| P0447 | Evaporative Emission System Vent Control Circuit Open | Open wiring or vent valve coil, unplugged connector |
| P0448 | Evaporative Emission System Vent Control Circuit Shorted | Shorted vent valve coil or wiring |
| P0449 | Evaporative Emission System Vent Valve/Solenoid Circuit | Vent solenoid or wiring fault, corrosion at the connector |
| P0450 | Evaporative Emission System Pressure Sensor/Switch “A” Circuit | Tank pressure sensor or wiring fault |
| P0451 | Evaporative Emission System Pressure Sensor/Switch “A” Circuit Range/Performance | Implausible sensor reading, sensor drift, blocked sensor port |
| P0452 | Evaporative Emission System Pressure Sensor/Switch “A” Circuit Low | Signal shorted to ground or open 5 V reference, failed sensor |
| P0453 | Evaporative Emission System Pressure Sensor/Switch “A” Circuit High | Signal shorted to voltage or open ground, failed sensor |
| P0454 | Evaporative Emission System Pressure Sensor/Switch “A” Circuit Intermittent | Loose or corroded connector, chafed wiring |
| P0455 | Evaporative Emission System Leak Detected (Large Leak) | Fuel cap missing, disconnected hose, vent valve stuck open, purge valve stuck closed during the test |
| P0456 | Evaporative Emission System Leak Detected (Very Small Leak) | Ageing cap seal, small hose cracks, leaking filler neck or valve seal |
| P0457 | Evaporative Emission System Leak Detected (Fuel Cap Loose/Off) | Cap not tightened after refuelling, damaged or wrong cap |
| P0496 | Evaporative Emission System High Purge Flow | Purge valve leaking or stuck open, vapour flow when no purge is commanded |
| P0497 | Evaporative Emission System Low Purge Flow | Restricted purge line or valve, blocked canister, purge path check valve fault |
| P2400 | Evaporative Emission System Leak Detection Pump Control Circuit/Open | Open wiring or pump/solenoid coil, unplugged connector |
| P2401 | Evaporative Emission System Leak Detection Pump Control Circuit Low | Control circuit shorted to ground, failed pump or solenoid |
| P2402 | Evaporative Emission System Leak Detection Pump Control Circuit High | Control circuit shorted to voltage, failed pump or solenoid |
Closing
Most EVAP faults are found by working from simple to complex: cap, live data, valve sealing, then smoke. Understanding the ECU’s purge and leak test logic turns a vague emissions light into a clear repair.
Need the original stock file for a specific ECU hardware and software number? Browse the ECUFlashFiles original file catalogue.